vLLM V1 Engine Design Ⅰ: The Excution Loop

vLLM is a high-perfomance, user-friendly library for LLM serving. It has rapidly gained widespread popularity among individual users, developers and enterprises since its launch. As the serving latency continues to decrease, CPU overhead has become a clear bottleneck to further accerating model serving on the vLLM V0 engine core. One of the key motivations for migrating to the vLLM V1 engine core is to address this bottleneck

vLLM V1 isolates CPU work into two dedicated processes. One process handles user-facing API requests, HTTP/TCP communication, detokenization, etc.; the other spins in a busy loop scheduling and dispatching GPU workloads. By separating web I/O and token processing from GPU dispatch, this design keeps the accelerator busy and minimizes GPU idle time.

vLLM architecture, Source: vLLM official docs

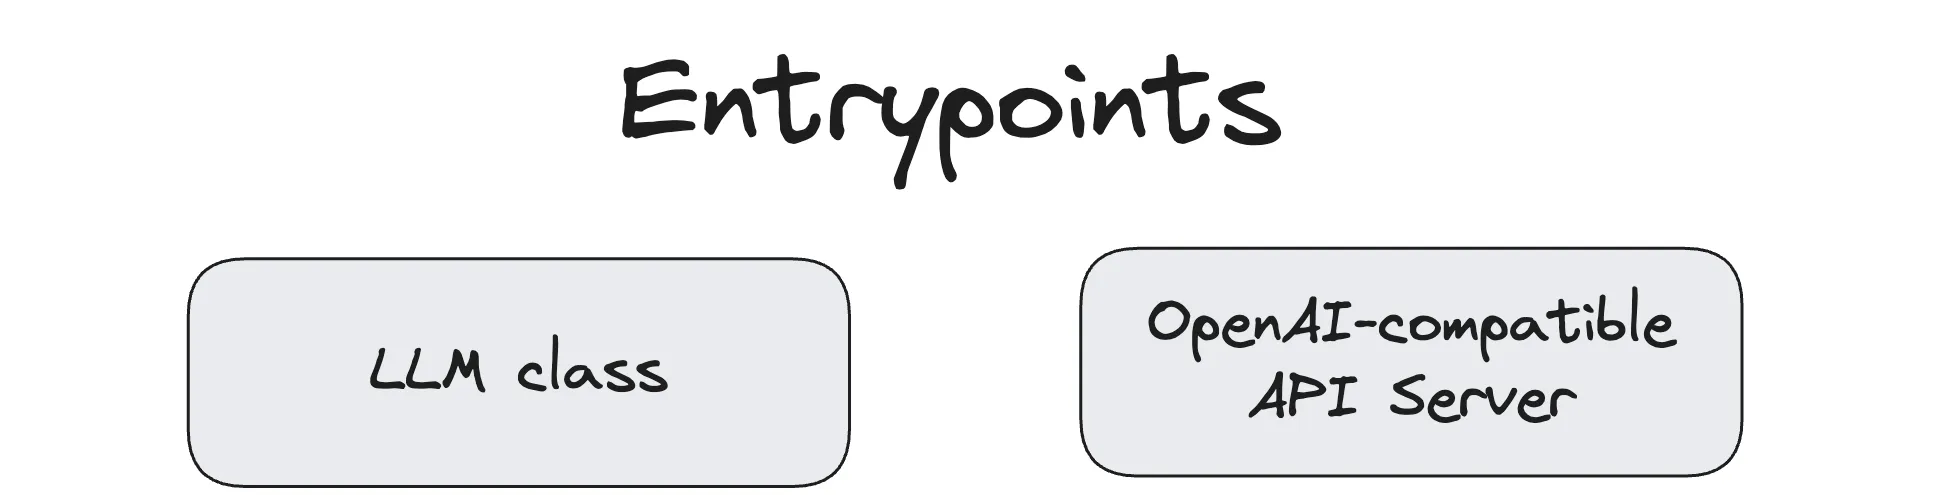
Offline batching and online streaming are two modes of using the vLLM inference engine. Offline batching is driven by the Python LLM class. It exposes the following APIs:

  • generate() is for autoregressive text generation—given a prompt, it produces a completion.

  • chat() is for conversation. It supports conversation context defined like

    1
    2
    3
    4
    conversation = [
    {"role": "system", "content": "You are a helpful assistant"},
    {"role": "user", "content": "Hello"},
    ]

    A chat template then serializes this history into a single prompt string using the model’s special tokens. Under the hood, chat() calls the generate() routine to complete the next assistant turn.

  • Other APIs: beam_search() encode() embed() classify()

The calls to these functions are blocking — it will block until the full output is returned.

AsyncLLM , on the other hand, is built on top of Python’s asyncio and is aimed for LLM serving or online streaming. vLLM provides an implementation of OpenAI compatible API server exposing entrypoints such as /v1/completions and /v1/chat/completions which calls generate() and chat() on AsyncLLM under the hood.

Offline Batching

The excution loop of running a traditional text-only offline LLM chat is shown in Figure 1 where the arrows in the figure indicate data flow and ↻ indicates an infinite loop. An individual thread has a gray background.

vLLM offline batching

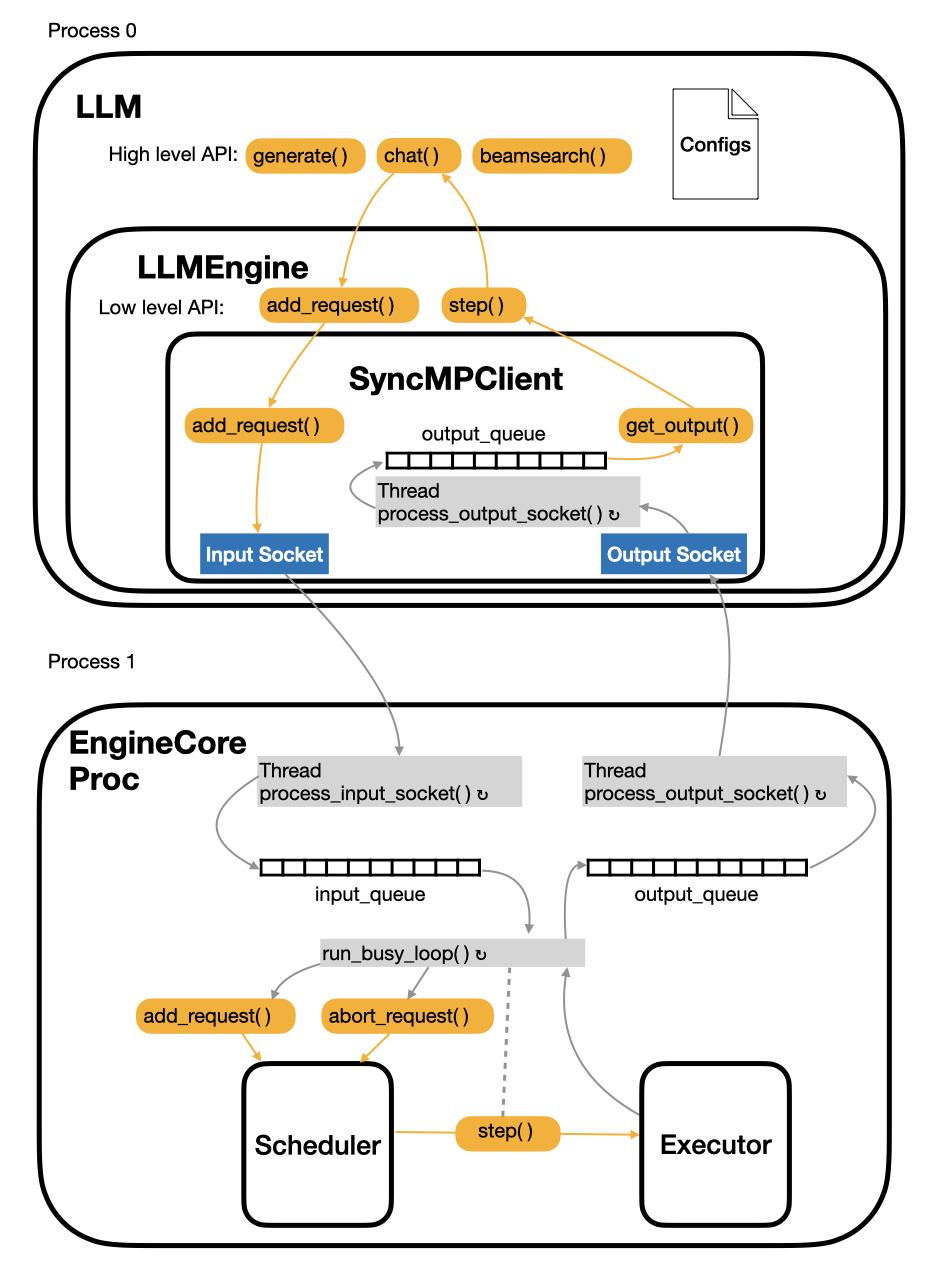
Internally, LLM submits user requests via add_request() and generates outputs with step(), both methods are defined on LLMEngine. While the V1 LLMEngine preserves the V0 API surface for backward compatibility, it offloads most of the request handling and output handling to the underlying SyncMPClient .

vLLM offline batching follows the producer-consumer concurrency paradigm. Each thread spends most of their time waiting on I/O-polling sockets or blocking on queue.get() — during which they release the GIL and let other threads run.

NOTE

Python Multi-threading Model

Python provides OS-level multithreading via the threading module. Each Thread object maps to a native thread with its own stack and execution context.

However, within a single Python process, only one thread can execute Python bytecode at a time because every thread must hold the Global Interpreter Lock (GIL).

I/O-bound workloads can benefit from multithreading—threads release the GIL while waiting on I/O—but CPU-bound tasks cannot achieve true parallel execution.

This explains why vLLM v1 chooses to put model execution in a separate process instead of a thread — circumventing the GIL to get real parallelism. This is at the expense of inter-process data copies via message queues and added architectural complexity.

But in the other hand, this multi-process design decouples client handling from model execution, even allowing them to run on separate machines if desired.

SyncMPClient - as its name suggests—serves as the communication client for the backend execution ‘server’ process EngineCoreProc .

  • Two ZMQ sockets are used for inter-process-communication.
  • add_request( ) serializes and packages the user’s inference request, then sends it over the input socket.
  • get_output() simply blocks on output_queue.get(), returning the next available response.
  • A dedicated background thread process_output_socket()continuously polls the output socket, deserializes any incoming responses, and enqueues them into an internal output_queue

EngineCoreProc runs 3 infinite-loop threads in a single process:

  • The main thread dequeues requests from input_queue and calls add_request( ) or abort_request( ) depending on the request type. It invokes step() to feed the scheduler’s output into the inference engine.
  • Input-polling thread spins reading the input socket and deserializes each incoming message and enqueues it onto input_queue
  • Output-dispatch thread blocks on output_queue until results appear and sends serialized result over the output socket.
NOTE

queue— A synchronized queue class

The input_queue and the output_queue in vLLM V1 architecture are both of instance of queue.Queue. It is a FIFO queue which ensures thread safety when multiple threads are excuting push() or get() concurrently.

The get() method removes and returns an item from the queue. If the option block is set to be True (which is by default), it will block the code execution until there’s an item is available in the queue. If the queue is empty, get() enters an uninterruptible wait on an internal lock—releasing the GIL so other threads can run—before returning the enqueued item.

Online Streaming

online streaming

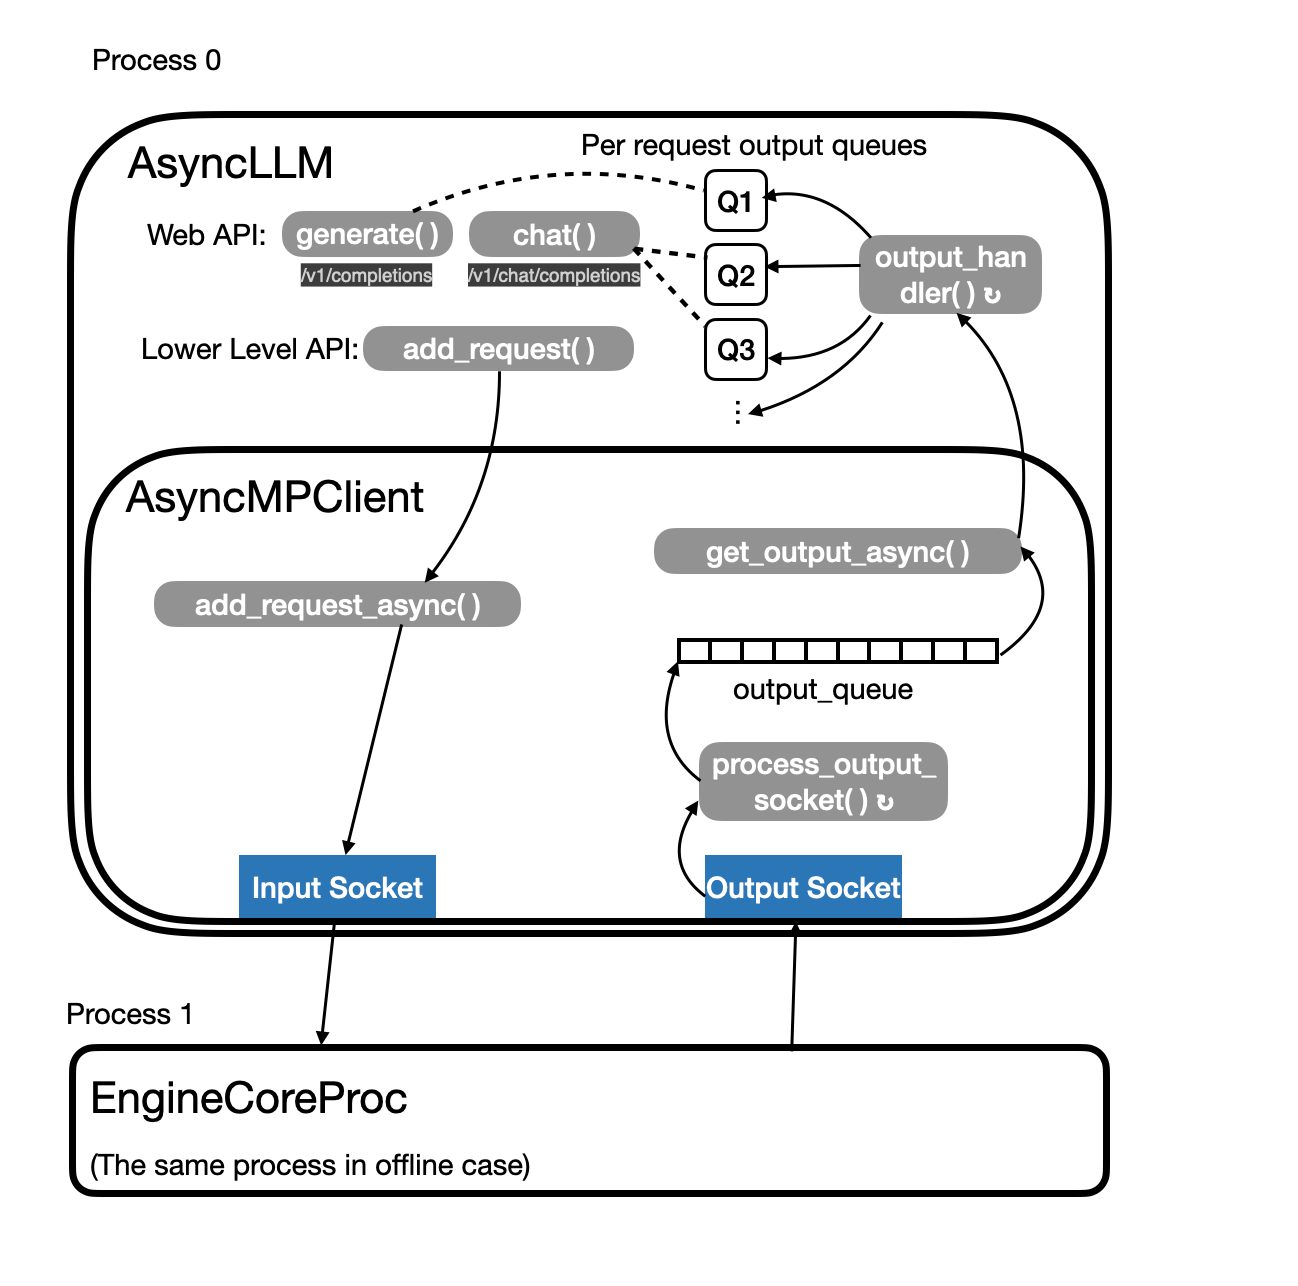
In online streaming scenarios, each request has its own lifecycle and must be driven incrementally rather than in one shot via generate() or chat(). To support this, vLLM uses Python’s asyncio:

  • Per‐request coroutines: Each incoming request is handled by its own coroutine on a single event loop. Because coroutine switches don’t require releasing the GIL, they’re much lighter than threads.
  • Per‐request queues: AsyncLLM maintains a dedicated output queue for each request.
  • output_handler() loop: A background coroutine continuously awaits AsyncMPClient.get_output_async(), then routes and appends each new chunk of data into the appropriate request queue. By aggregating new data with what’s already in the queue, it avoids the overhead of sending each token or chunk separately.
  • AsyncMPClient: Functionally analogous to SyncMPClient, but replaces its blocking threads with non-blocking coroutines and await calls.

Registering custom C++/CUDA operators using modern PyTorch APIs

Nowadays, most ML inference engines are built on top of PyTorch‘s echosystem. By leveraging custom operators, they deliver state-of-the-art throughput on large workloads—ranging from LLMs to Stable Diffusion. Compared to PyTorch’s native kernels, these operators usually offer lower latency and enable optimized implementations for cutting-edge operations that aren’t yet supported out of the box.

This tutorial shows you how to build and integrate a simple PyTorch custom operator that runs on both CPU and NVIDIA GPUs. For the PyTorch APIs used in this tutorial, check out the official PyTorch documentation and this Google Doc. An official example project can be found on GitHub. Here, we provide a more compact, self-contained version to illustrate the same concepts in a smaller, easier-to-follow project.

This simple custom operator is provided purely for demonstration; in real-world projects,PyTorch’s built-in operators can already handle simple workloads — like element-wise multiplication efficiently.

The repository of this tutorial:


Kernel Implementation

The kernel simply multiply the input by 1.23 — equivalent to this Python snippet:

1
2
3
def short_op(x: torch.Tensor):

return x * 1.23

We define our simple kernel in the simple_ops.cu file.

1
2
3
4
5
6
7
8
9
10
11
12
13
14
15
16
17
18
19
20
21
22
23
24
25
26
27
28
29
30
31
32
33
34
35
36
37
38
39
40
41
42
43
44
// my_ops/csrc/simple_ops.cu

#include <cuda_runtime.h>
#include <cuda_fp16.h> // __half, __float2half, etc.
#include <torch/extension.h>
#include <ATen/ATen.h> // at::empty_like, at::ScalarType, etc.
#include <ATen/cuda/CUDAContext.h> // at::cuda::getCurrentCUDAStream()
#include <Python.h>

// ----------------------------------------
// Device kernel template
// - Works for float and __half via template dispatch
// ----------------------------------------
template <typename scalar_t>
__global__ void shortKernel(
const scalar_t* __restrict__ in,
scalar_t* __restrict__ out,
size_t total_elems
) {
size_t idx = blockIdx.x * blockDim.x + threadIdx.x;
if (idx < total_elems) {
if constexpr (std::is_same<scalar_t, __half>::value) {
// half-precision needs explicit conversion of the constant
out[idx] = __float2half(1.23f) * in[idx];
} else {
out[idx] = scalar_t(1.23) * in[idx];
}
}
}

// ----------------------------------------
//CPU implementation
// ----------------------------------------
template <typename scalar_t>
void short_kernel_cpu_impl(
const scalar_t* __restrict__ in,
scalar_t* __restrict__ out,
int64_t total
) {
for (int64_t i = 0; i < total; ++i) {
out[i] = scalar_t(1.23) * in[i];
}
}

We also provide two binding functions that sit between PyTorch and our low-level C++/CUDA code. These wrappers map PyTorch’s tensor dtypes to the correct C++/CUDA scalar types and then launch the appropriate kernel.

PyTorch Binding: CUDA Side

1
2
3
4
5
6
7
8
9
10
11
12
13
14
15
16
17
18
19
20
21
22
23
24
25
26
27
28
29
30
31
// my_ops/csrc/simple_ops.cu
// ----------------------------------------
// CUDA-side PyTorch binding function
// - Checks that input is on CUDA
// - Allocates output tensor of same shape & dtype
// - Computes grid/block sizes
// - Retrieves current CUDA stream
// - Dispatches to the proper instantiation of shortKernel<scalar_t>
// ----------------------------------------

torch::Tensor short_kernel(at::Tensor x) {
TORCH_CHECK(x.is_cuda(), "Input must be a CUDA tensor");
size_t total = x.numel();
auto x_out = torch::empty_like(x);
const int threads = 256;
const int blocks = (total + threads - 1) / threads;
cudaStream_t stream = at::cuda::getCurrentCUDAStream();

AT_DISPATCH_FLOATING_TYPES_AND_HALF(x.scalar_type(), "short_kernel", [&] {
using scalar_t = scalar_t;
const scalar_t* in_ptr = x.data_ptr<scalar_t>();
scalar_t* out_ptr = x_out.data_ptr<scalar_t>();
// Launch kernel
shortKernel<scalar_t><<<blocks, threads, 0, stream>>>(
in_ptr, out_ptr, total
);
});

return x_out;
}

PyTorch Binding: CPU side

1
2
3
4
5
6
7
8
9
10
11
12
13
14
15
16
17
18
19
20
21
22
23
24
25
// ----------------------------------------
// CPU-side PyTorch binding function
// - Ensures input is on CPU
// - Makes tensor contiguous
// - Allocates output
// - Dispatches to short_kernel_cpu_impl<scalar_t>
// ----------------------------------------
torch::Tensor short_kernel_cpu(at::Tensor x) {
// Making sure x is a CPU tensor
TORCH_CHECK(!x.is_cuda(), "short_kernel_cpu: expected CPU tensor");
auto x_contig = x.contiguous();
auto y = at::empty_like(x_contig);
int64_t total = x_contig.numel();

// Dispatch to different instantiation according to scalar_t
AT_DISPATCH_FLOATING_TYPES_AND_HALF(
x_contig.scalar_type(), "short_kernel_cpu", [&] {
const auto* in_ptr = x_contig.data_ptr<scalar_t>();
auto* out_ptr = y.data_ptr<scalar_t>();
short_kernel_cpu_impl<scalar_t>(in_ptr, out_ptr, total);
}
);

return y;
}
What is AT_DISPATCH_FLOATING_TYPES_AND_HALF?

Here, AT_DISPATCH_FLOATING_TYPES_AND_HALF becomes roughly

1
2
3
4
5
6
7
8
9
10
11
12
13
14
15
16
17
18
19
20
21
22
23
24
25
26
27
28
29
30
31
32
33
34
35
36
37
38
39
switch (x.scalar_type()) {
case at::ScalarType::Float: {
// 1) Pick C++ type float for this branch
using scalar_t = float;

// 2) “Insert” your lambda body here, with scalar_t = float:
// - read pointers as float*
// - launch the CUDA kernel instantiation shortKernel<float>
// shortKernel<float><<<blocks, threads, 0, stream>>>(
// reinterpret_cast<const float*>(x.data_ptr<float>()),
// reinterpret_cast<float*>(x_out.data_ptr<float>()),
// total
// );
break;
}
case at::ScalarType::Double: {
// 1) Pick C++ type double for this branch
using scalar_t = double;

// 2) Run the exact same code, but now:
// - in_ptr and out_ptr are double*
// - kernel invocation becomes shortKernel<double><<<…>>>(…)
break;
}
case at::ScalarType::Half: {
// 1) Pick C++ type at::Half (alias for CUDA __half)
using scalar_t = at::Half;

// 2) Again run the same code, but now scalar_t = at::Half:
// - in_ptr and out_ptr are at::Half*
// - kernel invocation becomes shortKernel<at::Half><<<…>>>(…)
// - inside the kernel the constexpr branch uses __float2half for the constant
break;
}
default:
// If the tensor’s dtype isn’t float/double/half, error out
AT_ERROR("short_kernel not implemented for this scalar type");
}

This macro eliminates boilerplate and guarantees you cover all the major floating-point types seamlessly.

Kernel registration:

Finally, we wire everything into PyTorch’s dispatcher:

1
2
3
4
5
6
7
8
9
10
11
12
13
14
15
16
// my_ops/csrc/simple_ops.cu

TORCH_LIBRARY(my_ops, m) {
m.def("short_kernel(Tensor x) -> Tensor"); //schema
}

TORCH_LIBRARY_IMPL(my_ops, CUDA, m) {
// For CUDA tensors, use the above short_kernel()
m.impl("short_kernel", &short_kernel);
}

TORCH_LIBRARY_IMPL(my_ops, CPU, m) {
// For CPU tensors, use short_kernel_cpu()
m.impl("short_kernel", &short_kernel_cpu);
}

TORCH_LIBRARY(my_ops, m) registers operators to the namespace ‘my_ops’ in PyTorch, so we can use torch.ops.my_ops.short_kernel to call our implementations. To register this op, we need to pass a schema "short_kernel(Tensor x) -> Tensor" to tell PyTorch how this op can be called. Please see The Custom Operators Manual for more details.

  • TORCH_LIBRARY_IMPL(my_ops, CUDA, m) says “for the my_ops operator library, here are the implementations to use when the dispatch key is CUDA.”
  • m.impl("short_kernel", &short_kernel) binds the C++ function short_kernel(at::Tensor) as the CUDA‐backend kernel for that op. So if you do:
1
2
x = torch.randn(..., device="cuda")
torch.ops.my_ops.short_kernel(x)

the dispatcher will route the call into your short_kernel CUDA function.

  • TORCH_LIBRARY_IMPL(my_ops, CPU, m) does the same thing for the CPU dispatch key.
  • If you call
1
2
x = torch.randn(..., device="cpu")
torch.ops.my_ops.short_kernel(x)

then PyTorch will invoke your short_kernel_cpu(at::Tensor) function instead.

Setting Up the Build System

Following Python’s convention, we use setuptools to configure the build system.

Our code is as simple as the following:

1
2
3
4
5
6
7
8
9
10
11
12
13
14
15
16
17
18
19
20
21
# setup.py
from setuptools import setup, Extension
from torch.utils import cpp_extension

setup(name="my_ops",
packages=['my_ops'],
ext_modules=[
cpp_extension.CUDAExtension(
"my_ops._C",
["my_ops/csrc/simple_ops.cu"],
# define Py_LIMITED_API with min version 3.9 to expose only the stable
# limited API subset from Python.h
extra_compile_args={
"cxx": ["-DPy_LIMITED_API=0x03090000", "-O2"],
"nvcc": [
"-O3"
]},
py_limited_api=True)], # Build 1 wheel across multiple Python versions
cmdclass={'build_ext': cpp_extension.BuildExtension},
options={"bdist_wheel": {"py_limited_api": "cp39"}} # 3.9 is minimum supported Python version
)

By adding the compiler flag -DPy_LIMITED_API=0x03090000 , we can assure that the built extension can be run on any Python environment with version ≥ 3.9. It helps verify that the extension is in fact only using the CPython Stable Limited API which ensures forward compatibility. According to PyTorch documentation,

If this requirement (Defining the Py_LIMITED_API flag) is not met, it is possible to build a wheel that looks CPython agnostic but will crash, or worse, be silently incorrect, in another CPython environment.

We need to register an empty _C module as the following code block shows to let python directly import our built .so library. By configuring ext_modules.cpp_extension.CUDAExtension.name = “my_ops._C” , the output file of our built module would be my_ops/_C.abi3.so. By executing from my_ops import _C , our custom ops can be registered to PyTorch since our simple_ops.cu file contains calls to TORCH_LIBRARY andTORCH_LIBRARY_IMPL .

1
2
3
4
5
6
7
8
9
10
11
// my_ops/csrc/simple_ops.cu
extern "C" PyObject *PyInit__C(void) {
static struct PyModuleDef def = {
PyModuleDef_HEAD_INIT,
"_C", // <— the name of the module
nullptr,
-1,
nullptr
};
return PyModule_Create(&def);
}
How to export a c++ function to Python?

The extern "C" PyObject *PyInit__C(void) is a standard way to expose a cpp function to Python.

To register a cpp function, we need to do the following things:

  • Write a real C++ func (add_one).
  • Wrap it in a py_add_one that speaks the Python/C API: parsing args & building return values.
  • Fill out a PyMethodDef[] with your method(s).
  • Point your PyModuleDef at that table.
  • Keep your same PyInit__C() entrypoint.

A complete example:

1
2
3
4
5
6
7
8
9
10
11
12
13
14
15
16
17
18
19
20
21
22
23
24
25
26
27
28
29
30
31
32
33
34
35
36
37
38
39
40
41
42
// my_ops/csrc/simple_ops.cu
#include <Python.h>

// 1) Your “real” C++ function you’d like to expose
int add_one(int x) {
return x + 1;
}

// 2) A thin C‐API wrapper that parses Python args and calls your C++
// function, then builds a Python return value.
static PyObject *py_add_one(PyObject *self, PyObject *args) {
int input;
// Parse a single integer argument
if (!PyArg_ParseTuple(args, "i", &input)) {
return nullptr; // on failure, Python exception is set for you
}
int result = add_one(input);
// Build a Python integer to return
return PyLong_FromLong(result);
}

// 3) Method table: tell Python which names map to which C functions
static PyMethodDef SimpleOpsMethods[] = {
// name in Python, C wrapper, argument style, doc‐string
{ "add_one", py_add_one, METH_VARARGS, "Add one to an integer" },
{ nullptr, nullptr, 0, nullptr } // sentinel
};

// 4) Module definition: plug in that table
static struct PyModuleDef simpleops_module = {
PyModuleDef_HEAD_INIT,
"_C", // the module name
"My simple ops", // optional doc‐string
-1, // per‐interpreter state size (−1 means “global”)
SimpleOpsMethods // the method table
};

// 5) Module init: Python will call this when you do “import my_ops._C”
extern "C" PyObject *PyInit__C(void) {
return PyModule_Create(&simpleops_module);
}

Here we use extern “C” to disable the name mangling feature of C++. Without extern "C", the compiler might emit a symbol like _Z10PyInit__Cv (or worse), and Python wouldn’t be able to locate the entry point it expects.

To register our custom ops at import time, __init__.py should be written as

1
2
3
// my_ops/__init__.py

from . import _C

Project File Organization

The current file organization:

1
2
3
4
5
6
my_ops/
|-- csrc/
| |-- simple_ops.cu
|-- __init__.py
graph_pytorch.py
setup.py

Building Python Module and Importing

From the project’s root directory, run:

pip install -e .

This command tells pip to install the current directory (. ) as an editable package.

During installation, pip will compile the C++/CUDA source code (as specified in setup.py) and place the resulting .so extension inside the package directory ./my_ops .

Once that’s done, you can simply:

1
2
import my_ops
y = torch.ops.my_ops.short_kernel(x)

to invoke your custom operator.